Process overall

Create Specifically modified g.code
In the image above, you can see a close-up of the g-code that has been specifically modified. The larger shapes represent 2x larger layer height which is used to define “optimization area”.
To utilize SelfSlice, you need to work with a specifically modified g-code. To create this modified g-code, make use of the Height Range Modifier in PrusaSlicer.
If you intend to print with a layer height of 0.2 mm, for the optimization area, use a 0.4 mm layer height. The rest of the print will have 0.2 mm layer height.

Drag and drop g.code to SelfSlice
SelfSlice automatically identifies optimization areas and optimizes them. In the image above, you can see what the g-code looks like after SelfSlice optimization. The green shapes have been modified to match the layer height of the rest of the print. In the optimized area, everything except external perimeter (one visible line) has 2x larger layer height, resulting in significant time savings during printing.
SelfSlice is the only tool on the market capable of printing the external perimeter with a different layer height than the internal perimeter. This innovation enables even the fastest 3D printer on the planet to operate even faster.

Faster printing and no difference in quality
In this image, you can compare an optimized print with a non-optimized one. From an external perspective, there’s no visible difference, but you’ll save several hours of printing time with the optimized version.
Three simple steps to save several hours

Set up "optimized areas"
To optimize a print in SelfSlice, you need to define the “optimization area.” This is done by simply setting a 2x larger layer height for the area you want to optimize.
For example, if you want to print with a 0.2 mm layer height, you should use a 0.4 mm layer height for the optimized area. To establish the optimized area, utilize the height range modifier in PrusaSlicer. By doing this, you’ll generate the “specifically modified” g-code required for SelfSlice. You have the flexibility to create as many “optimized areas” as you need.

Open SelfSlice
The rest of the process is straightforward. Simply drag and drop specifically modified g.code into SelfSlice and the software will automatically optimize the print based on the “optimized areas” you set up in the previous step.
If you desire greater control over the optimization process, you can switch to “manual” mode to see the exact adjustments being made. However, in 99% of cases, all you need to do is drag and drop the file.

Inspect and Print
Click “Optimize and Download” button. It downloads the optimized g.code. Then, always open the optimized g.code in PrusaSlicer to see, if the optimization is okay. You can just drag and drop the optimized g.code onto the PrusaSlicer icon.
Due to early version of SelfSlice, there may be instances where the optimization skips some external perimeters, resulting in empty lines. Don’t worry, this occurs infrequently and is easily noticeable.
If everything is okay, you can proceed to upload the g-code to your 3D printer and enjoy up to a 40% reduction in printing time.
Explanation: In optimized areas, you of course lose detail. But if you do it right, it will not affect the print quality of the part.
Optimization is best used for areas with vertical walls where one layer is stacked onto next layer. But it is also gread for areas where there is a little difference betwen previous layer (e.g. small detail or short “stairs”).
Supported hardware and software
This beta version of SelfSlice requires g.code as input generated by actual version of PrusaSlicer. Any single-extrusion 3D printer compatible with PrusaSlicer will also work with SelfSlice. In Beta version, application may crash when trying to optimize g.code with print supports. If crash happens, try restarting your browser or using another one.
Before you start - specific settings of Slicer
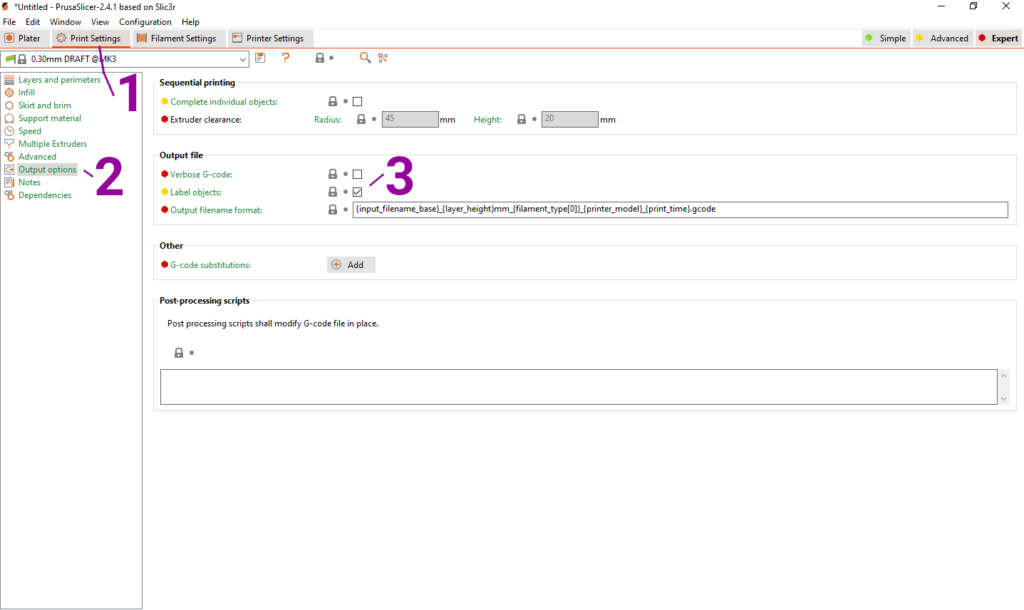
SelfSlice uses default settings of PrusaSlicer so in most cases you can skip this step. SelfSlice needs specific Slicer settings to be able to select specific segments of printed model (infill, external perimeters, supports, ..) for layer height modification. In PrusaSlicer, please check that your actual print settings have enabled “Label objects:” option. To do this, go to: Print settings (1); Output options (2); and check the “Label objects:” option (3)
How to prevent common problems
Always review final modified g.code. It rarely happens that SelfSlice skips layer of modified segment, leaving the blank horizontal line in final printed model. For the review, you can use Prusa G-code viewer.
In SelfSlice, please be careful to not to modify height of any segment in any layer twice. Also carefully divide between input g.code files and output g.code files – if you unintentionally use already modified g.code as input g.code, you can also divide selected segment twice and end up with non-printable g.code (due to incorrect layer height).
About SelfSlice
This software is created in collaboration with Dolphin Printer s.r.o. and AICRA s.r.o. The company AICRA is the author of SelfSlice software, Dolphin Printer is exclusive owner of the software. Any Mentions of external subjects have been included for easier orientation of the users of the software. All trademarks are property of their respective owners.